August 2018, Vol. 245, No. 8
PPSA 2018 Pigging Update
Making Simple Smart and Smart Simple: Cost-Effective, Low-Risk Pipeline Inspection
By Paul Clayton, i2i Pipelines, Manchester, UK
Traditionally, pipeline pigging has two extremes. At one end of the spectrum are cleaning pigs and at the other end are in-line inspection (ILI) tools or intelligent pigs, and there is little that sits between. Cleaning pigs are basic tools that are frequently and easily deployed and carry little operational risk of lodging in the line, however, they gather little or no data.
ILI tools are far more complex by design as the industry demands higher specification, greater accuracy and the ability to detect more types of pipeline defects. The consequence of this is larger tools needing specialist technicians, never mind the increased support and handling equipment as well as tight operating parameters and run scheduling.
Operators have identified a need for tools in this middle ground of the two extremes and have encouraged the development of simple, easy to use and deploy inspection technology that uses advanced electromagnetic sensors integrated on to cleaning tools – or making the simple, smart.
Since conception in 2015, in the middle of the oil industry downturn, i2i Pipelines embraced the opportunity of providing operators with some of the necessary information to make informed decisions on pipeline integrity in a cost effective low risk manner and the tool fleet began developing, as a system for gathering internal metal loss and flow assurance information.
This paper will provide information on three recently completed projects in the form of brief case studies highlighting the challenge, solution and outcome where innovative pigging solutions have been successfully deployed to meet major offshore operator’s requirements.
Case Study 1
An offshore operator in the Far East had a requirement to inspect two multiphase (oil, gas, water) pipelines that ran from two different platforms to an FPSO. The pipelines themselves were 10-inch in an insulated 14-inch carrier pipe. One pipeline was 2.5 km in length, the other 4.3 km.
Traditional inspection methods had been considered but not pursued for a number of reasons, not limited to the product type ruling out Ultrasonic technology, the Wall Thickness of the pipe ruling out MFL technology and the fact that although fitted with traditional pig traps at the launch platform, the receiver system at the FPSO comprised a pigging ball valve located in the turret. Furthermore, the operating temperature of 75C and the fact that the pipeline also had a flexible riser section also precluded the use of some forms of traditional ILI.
Previous operational pigging conducted by the operator had been extensive but very unsuccessful. Not only were their pigs considered to be “tumbling” in the line, they were getting damaged either in the line or during receive in the pig valve at the FPSO.
The operator considered that the pipelines were quite clean and reached the conclusion that the receiving procedure needed to be reviewed as the pigs were constantly damaged.
Following initial contact with i2i pipelines, the client asked for a review of the design of their operational foam pigs and to comment accordingly whilst at the same time producing a proposal to inspect the pipelines. The inspection work would be contingent on successful testing of the SmartFoam™ technology at their extensive test facility in China.
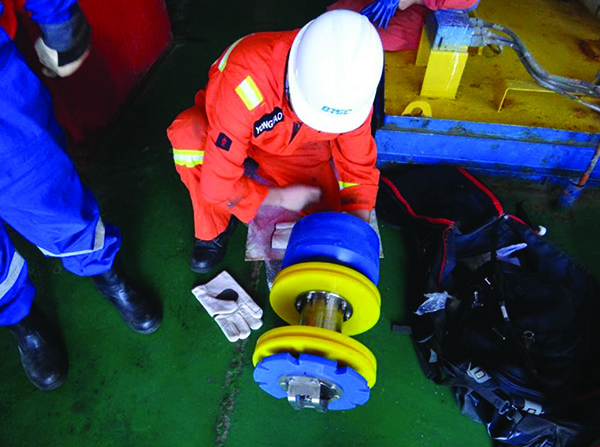
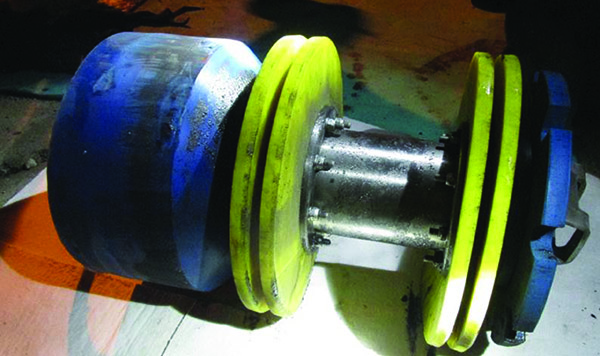
After an initial review, i2i produced a design of pig as a dummy to be tested in the pipeline whilst also producing an operational SmartFoam™ tool to be run in the test loop that contained a large number of defects machined in by the client.
The pig was tested at a pigging loop in China against client manufactured defects in a “blind-test” scenario. For this specific test, the inspection technology passed with a POD of 97%. Deposit samples, including wax, were also introduced into the test loop to determine anomaly detection and sizing in an un-cleaned pipeline.
The final stage before a fully operational run was to test the design under conditions including being received in a pig valve. For this stage of the operation the dummy pig was run in the offshore pipeline and successfully received in the pig valve.
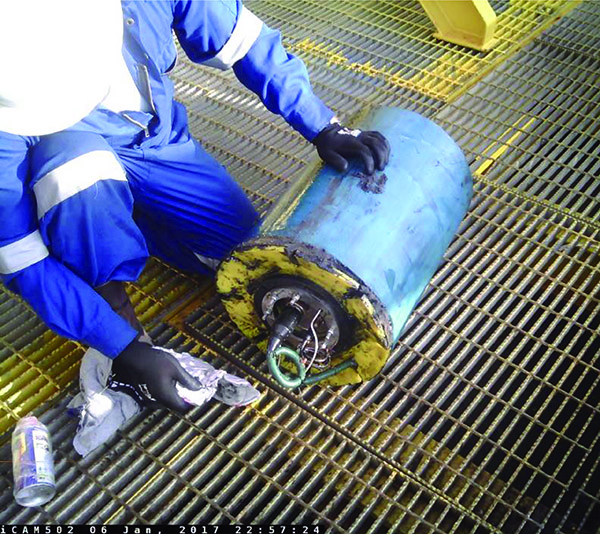
There was no evidence of tumbling in the pipeline and the pig was received as expected and in the correct orientation. The internal basket mark called “the spider” on the pig was a clear confirmation that the pig had not tumbled during operation and had been received correctly.
Following the successful passing of the blind test to prove the defect detection and sizing capability of the tool and subsequent successful deployment of the dummy tool in the actual pipeline, a tool and technician were mobilized offshore.
The tool was run and received in the first pipeline in September 2017. At the time of issuing this paper the operation to inspect the second pipeline is still ongoing due to some damage on the dummy tool at receive in the pigging valve on the FPSO
In summary, this was a very challenging inspection project with the traditional ILI methods being ruled out for a variety of reasons around the pipeline’s design and operation. It is believed this job is the first of its type successfully completed in receiving an inspection tool in a standard pigging valve in the turret on an FPSO.
Case Study 2
A major offshore operator in Asia had a requirement to inspect a 12-inch-by- 50-km multiphase pipeline from an offshore platform to onshore facility.
The challenge for this particular pipeline was the fact that the line was known to be suffering from a large quantity of dents. This was originally identified from the running of basic bi-directional pigs fitted with traditional aluminium gauge plates during normal operational pigging on narrow bodied pigs.
Following multiple runs with gauge tools, the operator decided to contract one of the major ILI vendors to inspect the pipeline with an MFL tool and, ahead of the inspection run, provide a calliper tool to measure and quantify the dents in the line to ensure subsequent safe passage of the ILI tool without getting stuck.
The inspection equipment was mobilized and at the same time, the operator contacted i2i to assess the pipeline for suitability of running a Pioneer™ inspection tool as a possible alternative solution. A technical assessment was completed and a Pioneer™ tool was manufactured and mobilized along with a technician with the intent of training a local technician in the operation of the tool.
The operator ran the planned calliper tool and received the report from the ILI vendor which identified the pipeline had over a dozen reportable dent features, the largest dent in the pipeline had reduced the bore in a single plane down from 303mm to 253mm.
Upon confirmation of these dents in the pipeline, the company conducting the calliper run informed the client that they would be unwilling to run their MFL tool in the line due to the risk associated with the tool becoming stuck.
After evaluation of pipeline operating conditions and the size of the reported dents from the calliper tool, i2i deployed the 12-inch pig to inspect the pipeline.
The Pioneer™ tool was launched by our agent’s technicians after just a half day of training in the commissioning, loading and running of the tool demonstrating the simplistic operational use that underpins the ethos of the tool.
Due to having to use an undersized body and battery pack for the Pioneer™ tool because of the constraints around the dents in the line, the tool gathered data for 31 km out of the 50 km before the batteries ran out. However, after a quick overnight re-charge and a quick return offshore the tool was re-run at an increased flow rate and gathered data for the complete pipeline. The tool also had the IMU disabled to help mitigate power consumption.
A full pipeline inspection report highlighting the top 20 features providing the largest signal was provided to the client within three working weeks. The report also highlighted the position of a large number of dents in the pipeline that correlated nicely with the high-resolution caliper run from the ILI vendor.
In summary, the challenge of inspecting a badly dented pipeline at very short notice after the original contracted ILI vendor pulled out, along with many operational and logistical challenges, was met at very short notice to the satisfaction of the operator.
Case Study 3
An operator in the Far East, had a requirement to inspect a 16-inch-by-16.2 km multiphase pipeline that runs from an offshore platform to an onshore reception facility.
The pipeline had been subjected to a frequent cleaning campaign but due to concerns over the amount of wax in the line, the cleaning had been undertaken using foam pigs only, ranging from largely undersized to pipeline bore. The quantities of wax were of such a concern that the client wanted to try and quantify the amount of wax in the line and if possible, obtain other flow assurance information (such as pressure and temperature) at the same time as trying to inspect the pipeline for internal metal loss.
Following a detailed technical assessment, it was considered that the optimum inspection solution for the application was with SmartFoam and a tool was mobilized with a technician. The chosen design was an undersized foam pig fitted with the dent and deposit mapping disc (DDMD).
The addition of the DDMD brings another level of intelligence to the tools whilst still maintaining the underlying aim of simplicity and inspection without disruption. Furthermore, whilst having the initial aim of debris monitoring, the DDMD also facilitates accurate dent detection and measurement in a far more sophisticated manner than the traditional slotted gauge plate and in a far less complicated and cost-effective manner than a calliper tool. Furthermore, a local technician was trained to operate the tool in just half a day demonstrating how simple the tools are to operate.
Not only did the tool successfully inspect the pipeline through the existing wax deposits, the addition of the DDMD enabled the wax deposits to be mapped and quantified through the pipeline and a total volume of wax calculated. As a consequence, the operator would be able to formulate an appropriate strategy for both cleaning and wax-mitigation going forward.
Conclusion
As the three case studies prove, the benefits of integrating advanced sensors with simple mandrel or foam pigs can be significant and can provide operators valuable integrity and flow assurance information at low risk and relatively low cost when compared to traditional ILI methods.
Special design and manufacturing procedures can be followed such that foam pigs can be constructed in a way that allows them to take the payload of the internal pressure vessel making foam pigs a new inspection option for pipelines. They are easy to deploy and do not require the associated handling equipment and technicians.
The simplicity of design and operation of in-line inspection tools is an important step in the evolution of pipeline inspection, especially in this era of low oil prices. It is our strong belief that there needs to be a reversal in the trend of making things more and more complicated as simple tools with advanced sensors can be just as effective in detecting internal corrosion and other integrity threats. P&GJ
References
“The development of smart pig technology for launching & receiving through pigging valves,” Steve Banks and Callum Jones, Unpiggable Pipeline Solutions Forum, Houston, June 2017.
“Simplifying Pipeline Inspection. The integration of advanced eddy current sensors on to conventional foam pigs,” Steve Banks, PPSA Seminar Aberdeen, November 2015.




Comments