December 2016, Vol. 243, No. 12
Features
ILI Metal Loss Growth Analysis: Pipe Joint vs. Anomaly to Anomaly

As inline inspection continues to grow in popularity for assessing steel pipelines, new automated tools and techniques will continue to be developed for analysis and management of results.
PHMSA guidance and FAQs now state that a pipeline operator must consider previous assessments when developing mitigation plans and also contain a requirement to develop a corrosion rate that can be applied to anomalies to support reassessment interval calculations. Specifically, CFR 192 protocol F.01 and F.04, ASME B31.8S-Appendix A1.5, and API 1160 section 10 discuss the requirement to include previous assessment data in the response analysis.
This article summarizes a study that was performed comparing inline inspection growth analysis aggregated at a pipe joint level vs. a more rigorous anomaly to anomaly growth analysis. The purpose of the study was to compare three different methodologies to help determine if aggregated analysis (at a joint or weld level) is an appropriate level of growth analysis:
- Internal metal loss: pipe joint vs. anomaly-anomaly
- External metal loss: pipe joint vs. anomaly-anomaly
- External metal loss at girth weld (GW) vs anomaly-anomaly in GW
This study is a continuation of a prior presentation on pipe joint growth analysis: Leveraging Previous Inline Inspection Results, dated 2/10/14 (PPIM, 2014, Madden/Yeagley). This study is based upon final validated inline inspection results from 45 pipelines, ranging from 2005 to 2016, from five different tool vendors.
This study concludes that pipe joint/girth joint matching and defect growth analysis (at the aggregated joint or girth joint level) results in a high degree of confidence in the defect-growth calculations. Pipe joint matching can also help the analyst in determining if the current inspection is potentially under-called. Anomaly matching and growth analysis require additional resources to complete with potentially less certain defect-matching results.
Growth Calculation
Comparing anomaly depths from two inline inspections results in a mills per year (MPY) growth rate calculation. An MPY calculation is completed by determining the difference in anomaly depth from the current ILI to the previous ILI, and dividing by the duration between inspections. MPY can be calculated on a joint basis or anomaly basis.
For cases where there are anomalies on the current inspection, but no anomalies were called on the previous inspection, a decision should be made to use either a depth percentage of zero, or alternatively use a value equal to the previous inspection’s reporting threshold, such as 10%. To help gain insight into joint vs. anomaly to anomaly growth rates, this study only used anomalies that were identified on both the current and the previous inspections.
Inline inspection results are an indirect measure, with tool-specific reporting and accuracy specifications. Tool variances and tolerances between assessments can result in negative growth rates. While a negative growth rate is not physically possible, it is not uncommon for the growth calculation to result in negative growth (it is the excessive presence of negative growth that can alert the analyst to an under-called dataset).
Joint-Matching Process
In order to initiate the process of calculating the growth rate between two ILI inspections, there must be some type of matching performed between the two datasets to align all pipe sections. The process consists of matching “joints” of pipe between the two ILI datasets using the reported girth welds and the associated distance between the girth welds. This process can be much more rapidly performed by an analyst than trying to initially match specific anomalies.
Furthermore, there are existing computer algorithms (e.g.: Boyer Moore Algorithm) that would allow for machine matching. Matching the joints allows the analyst to correct for pipeline length error one joint at a time (i.e. place the error where it belongs vs. scaling the entire dataset with a single scaling value).
Upon completion of the joint-matching process, the inspection data is aggregated on a per-joint basis. This includes identifying the deepest internal and external anomaly on each matched joint, and also the anomaly count and average anomaly depth per joint.
These aggregated depths are used to determine a wall loss rate in mills per year (MPY) calculation for each joint of pipe. A “pipe joint” is defined as the piece of pipe between upstream and downstream girth weld. The “girth joint” is defined as the region of pipe from 1.5 ft. upstream of a girth weld to 1.5 ft. downstream of same girth weld, which is typically a region of different external coating.
The results of the joint growth rate calculation may help the analyst more quickly identify if the current inspection is potentially under-called. For example, negative growth could be an indication that the current inspection was under called, or the previous inspection was over called. The joint-matching process also allows the analyst to identify areas of pipe replacements that have occurred in the time between the two inspections (a benefit to the process of validating data in the operator’s system of record).
Matching Process
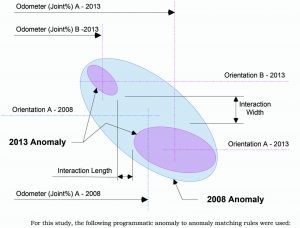
Anomaly to Anomaly matching is typically an “expert” performed activity. It is not simply trying to match the anomaly’s odometer, orientation, length, and width. Each ILI inspection’s anomaly description is influenced by the run interaction formula used, the anomaly growth rate, anomaly shape, tool resolution, variances between tool vendors, variances in sizing algorithms used by the same tool vendor, and tool odometer slippage.
Key challenges for anomaly matching include:
- Two anomalies may grow into one anomaly, especially in areas of general widespread corrosion.
- One anomaly called in prior ILI inspection may be called two anomalies in current ILI inspection, due to improved tool resolution and/or different Interaction formulas.
- Different vendors use different sizing algorithms, based on different criteria.
- Some vendors report anomaly orientations at 15-min intervals while other vendors report at 1-min intervals.
- Odometer values are affected by tool odometer sensor slippage.
The figure below demonstrates some of these challenges:
For this study, the following programmatic anomaly to anomaly matching rules were used:
- PREV_ORIENTATION = CURRENT_ORIENTATION +- 8 degrees (equals :15 minutes)
- PREVIOUS ODOMETER = CURRENT_ODOMETER (Adjusted using linear interpolation for relative JOINT_LENGTHS) +6 ft.
- Closest adjusted PREVIOUS ODOMETER to current Odometer when multiple anomalies meet Rule 1 and Rule 2.
Results
The only anomalies that were analyzed for this study were anomalies that could be matched in previous and current inspections. Keep in mind that inline inspection results are an indirect measure, with vendor-specific reporting and accuracy specifications. The negative growth rates calculated from the analysis are the result of tool variances between assessments, such as over call on previous inspection or under call on current inspection.
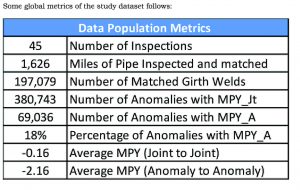
Some global metrics of the study dataset follows:
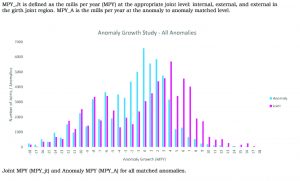
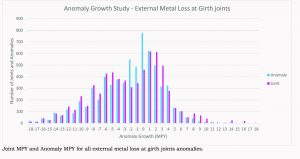
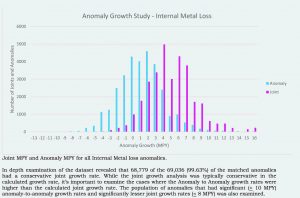
MPY_Jt is defined as the mills per year (MPY) at the appropriate joint level: internal, external, and external in the girth joint region. MPY_A is the mills per year at the anomaly to anomaly matched level.
Joint MPY (MPY_jt) and Anomaly MPY (MPY_A) for all matched anomalies.
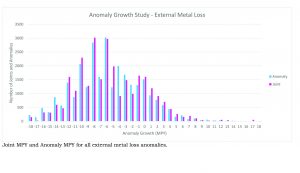
Joint MPY and Anomaly MPY for all external metal loss anomalies.
Joint MPY and Anomaly MPY for all external metal loss at girth joints anomalies.
Joint MPY and Anomaly MPY for all Internal Metal loss anomalies.
In depth examination of the dataset revealed that 68,779 of the 69,036 (99.63%) of the matched anomalies had a conservative joint growth rate. While the joint growth analysis was typically conservative in the calculated growth rate, it’s important to examine the cases where the Anomaly to Anomaly growth rates were higher than the calculated joint growth rate. The population of anomalies that had significant (> 10 MPY) anomaly-to-anomaly growth rates and significantly lesser joint growth rates (< 8 MPY) was also examined.
This examination revealed that the small population (0.36%) of anomalies that had significantly higher anomaly growth rates than the joint growth rate were typically deep anomalies, specifically anomalies with depths greater than or equal to 40%. This insight is evidence that an analyst could use the machine-generated calculated growth rate (aggregated at the joint and girth weld level) as a screening tool, preserving time and resources for the more in-depth analysis of the more severe anomalies.
Anomalies with anomaly growth rates larger than joint growth rates.
Conclusions
Performing pipe girth-weld matching tremendously aids both programmatic and expert anomaly-anomaly matching. In addition, calculating pipe joint MPY for external metal loss, external metal loss at girth joints, and internal metal loss is a conservative proxy for determining pipeline MPY. Girth-weld matching also provides an analyst with a screening tool to quickly determine which areas to perform further in-depth analysis. Specifically, girth-weld matching and subsequently calculating MPY on a per joint basis:
- Provides a good MPY proxy for anomalies where prior anomalies existed.
- Provides a good MPY proxy for anomalies where there were no anomalies on prior inspection.
- Supports analyst using the joint MPY as a screening tool for all anomalies with a depth of less than 40%.
- Supports analyst performing more in-depth anomaly to anomaly matching only for anomalies with a depth of greater than 40%.
- Provides an analyst with additional insight into areas of pipe replacement.
Authors: Mark Madden has 33 years of engineering experience, including 26 years in the oil and gas pipeline industry. He is an expert on pipeline risk-modeling and DOT pipeline integrity management rules. Madden holds a bachelor’s degree in civil engineering from the University of Colorado, Boulder.
Russ Council has over 25 years of liquid and natural gas pipeline experience, including integrity management, expansion projects and operator department leadership. Council holds a bachelor’s degree in civil engineering from the University of Oklahoma, Norman, OK.




Comments